Thursday, October 28, 2021

Configure ACR integration for existing AKS clusters | Authenticate with Azure Container Registry from Azure Kubernetes Service

When you're using Azure Container Registry (ACR) with Azure Kubernetes Service (AKS), an authentication mechanism needs to be established. 

To allow an AKS cluster to interact with ACR, an Azure Active Directory managed identity is used. 

Create Resource Group

Make sure you are login to Azure portal first.

az login

You need to create a resource group first.

az group create --name myResourceGroup --location southcentralus

Create AKS cluster with 2 worker nodes

az aks create --resource-group myResourceGroup --name myAKSCluster --node-count 2 --enable-addons monitoring --generate-ssh-keys

az aks show --name myAKSCluster --resource-group myResourceGroup

The above command should display Cluster exists in Azure portal

Create Azure Container Registry

Run the below command to create your own private container registry using Azure Container Registry (ACR).

az acr create --resource-group myResourceGroup --name myacrrepo31 --sku Standard --location southcentralus

Connect to the cluster

 az aks get-credentials --resource-group myResourceGroup --name myAKSCluster --overwrite-existing

To verify the connection to your cluster, use the kubectl get command to return a list of the cluster nodes.

kubectl get nodes


For Deploying Docker images from ACR into AKS Cluster

The following command allows you to authorize an existing ACR in your subscription and configures the appropriate ACRPull role for the managed identity.

az aks update -n myAKSCluster -g myResourceGroup --attach-acr myacrrepo31

To Detach ACR from AKS use below command

az aks update -n myAKSCluster -g myResourceGroup --detach-acr myacrrepo31


Sunday, October 17, 2021

How to Setup SonarQube on Azure VM | Install SonarQube Server on Ubuntu 18.0.4 VM in Azure Cloud

SonarQube is one of the popular static code analysis tools. SonarQube enables developers to write cleaner, safer code. SonarQube is open-source, Java based tool. SonarQube uses database for storing analysis results. Database can be MS SQL, Oracle or PostgreSQL.  We will use PostgreSQL as it is open source as well.

SonarQube Architecture:


SonarQube have three components namely
1. Scanner - This contains scanner and analyser to scan application code.
2. SonarQube server - contains Webserver(UI) and search server 
3. DB server - used for storing the analysis reports.

Please find steps for installing SonarQube on Ubuntu 18.0.4 in Azure Cloud. Make sure port 9000 is opened in firewall rules.


Pre-requisites:
Instance should have at least 2 GB RAMMake sure port 9000 is opened as port 9000 is default port for SonarQube.

Click here to learn to setup Azure VM.

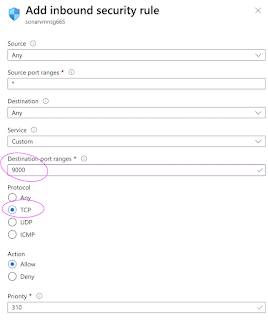
How to open port 9000 in Azure VM?

1. Select VM, under Settings--> choose Network


2. Click on Add inbound security role

 
3. Make sure you add entries like below: 
9000 as Destination port ranges
TCP as protocol
310 as priority number
port_9000 as Name

 4. Click on Add, once you add it should be like below:


Let us start with java install (skip java install if you already have it installed).

Change Host Name to SonarQube
sudo hostname SonarQube

Install Open JDK 11

sudo apt-get update && sudo apt-get install default-jdk -y

Postgres DB Setup

sudo sh -c 'echo "deb http://apt.postgresql.org/pub/repos/apt/ `lsb_release -cs`-pgdg main" >> /etc/apt/sources.list.d/pgdg.list'


sudo wget -q https://www.postgresql.org/media/keys/ACCC4CF8.asc -O - | sudo apt-key add -


sudo apt-get -y install postgresql postgresql-contrib


Ignore the message in red color below:

sudo systemctl start postgresql
sudo systemctl enable postgresql

Login as postgres user
sudo su - postgres

Now create a user below by executing below command
createuser sonar

9. Switch to sql shell by entering
psql


Execute the below three lines (one by one)

ALTER USER sonar WITH ENCRYPTED password 'password';

CREATE DATABASE sonarqube OWNER sonar;

 GRANT ALL PRIVILEGES ON DATABASE sonarqube to sonar;

Now to come out of Postgres by below command and press enter

\q


and then type exit to come out of postgres user.


3. Download SonarQube and Install

sudo wget https://binaries.sonarsource.com/Distribution/sonarqube/sonarqube-8.6.0.39681.zip
sudo apt-get -y install unzip

sudo unzip sonarqube*.zip -d /opt


sudo mv /opt/sonarqube-8.6.0.39681 /opt/sonarqube -v


Create Group and User:
sudo groupadd sonarGroup

Now add the user with directory access
sudo useradd -c "user to run SonarQube" -d /opt/sonarqube -g sonarGroup sonar 
sudo chown sonar:sonarGroup /opt/sonarqube -R

Modify sonar.properties file
sudo vi /opt/sonarqube/conf/sonar.properties
uncomment the below lines by removing # and add values highlighted yellow
sonar.jdbc.username=sonar
sonar.jdbc.password=password


Next, add the below line:
sonar.jdbc.url=jdbc:postgresql://localhost/sonarqube


Now press escape button, and enter :wq! to come out of the above screen.

Edit the sonar script file and set RUN_AS_USER
sudo vi /opt/sonarqube/bin/linux-x86-64/sonar.sh
Add enable the below line 
RUN_AS_USER=sonar


Setup SonarQube as a service(this will enable to start automatically when you restart the server)

Execute the below command:

sudo vi /etc/systemd/system/sonar.service


add the below code in green color:
[Unit]
Description=SonarQube service
After=syslog.target network.target

[Service]
Type=forking

ExecStart=/opt/sonarqube/bin/l
inux-x86-64/sonar.sh start
ExecStop=/opt/sonarqube/bin/li
nux-x86-64/sonar.sh stop
LimitNOFILE=131072
LimitNPROC=8192
User=sonar
Group=sonarGroup
Restart=always


[Install]
WantedBy=multi-user.target

Save the file by entering :wq!
 
Kernel System changes
we must make a few modifications to a couple of kernel system limits files for sonarqube to work.
sudo vi /etc/sysctl.conf

Add the following lines to the bottom of that file:

vm.max_map_count=262144
fs.file-max=65536

Next, we're going to edit limits.conf. Open that file with the command:

sudo vi /etc/security/limits.conf

At the end of this file, add the following: 

sonar   -   nofile   65536
sonar   -   nproc    4096


Reload system level changes without server boot
sudo sysctl -p

Start SonarQube Now
sudo systemctl start sonar

sudo systemctl enable sonar

sudo systemctl status sonar

Now wait for SonarQube to come up after you executed above commands, It will take a few mins to come up.
type q now to come out of this mode.
Now execute the below command to see if Sonarqube is up and running. This may take a few minutes.

tail -f /opt/sonarqube/logs/sonar*.log

Make sure you get the below message that says sonarqube is up..

Now access sonarQube UI by going to browser and enter public dns name with port 9000

Saturday, October 9, 2021

Certificate verification failed: The certificate is NOT trusted | Jenkins installation Error Fix | Jenkins Installation on Ubuntu 18.0.4 | Jenkins Installation on Ubuntu 20.0.4

If you try to install Jenkins on Ubuntu 18.0.4/20.0.4 instance, you may experience this problem.

Running sudo apt-get update on my AWS EC2 Ubuntu 18.04.01 LTS instance fails because Certificate verification failed: The certificate is NOT trusted.

Err:6 https://pkg.jenkins.io/debian-stable binary/ Release


Certificate verification failed: The certificate is NOT trusted. The certificate chain uses expired certificate.  Could not handshake: Error in the certificate verification. [IP: 199.232.66.133 443]

Fix for the above error

You need to install certificates to overcome this error:

sudo apt install ca-certificates

sudo apt-get update

Now try installing Jenkins

sudo apt install jenkins -y


DevSecOps Bootcamp Dec 2024 Schedule | DevSecOps & AWS Azure Cloud Coaching by Coach AK | DevSecOps and Cloud Computing Online Classes

Lot of new topics covered like GitHub Actions, GitHub Advanced Security, Helm, Prometheus and Grafana..) The DevOps requirements in the IT m...