Thursday, July 15, 2021

Unable to locate credentials - Ansible on AWS | NoCredentialsError: Unable to locate credentials

An exception occurred during task execution. To see the full traceback, use -vvv. The error was: NoCredentialsError: Unable to locate credentials

fatal: [localhost]: FAILED! => {"boto3_version": "1.17.112", "botocore_version": "1.20.112", "changed": false, "msg": "Error in describe_security_groups: Unable to locate credentials"}

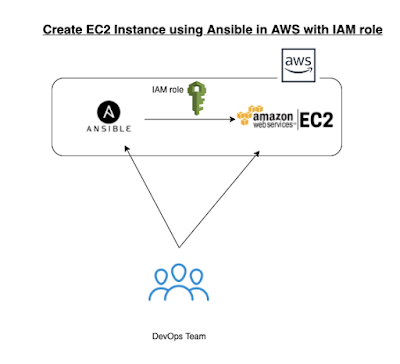
When ever you get this error, make sure you have right credentials setup in your EC2 instance or you have attached right IAM role with policy.

Option 1 

Create an IAM role and attach AmazonEC2FullAccess policy. and then attach this role to EC2 instance.

Option 2

sudo vi ~/.boto

add below three lines in the above file, replace the ?? with access key and secret key values.

[Credentials]
aws_access_key_id = ??
aws_secret_access_key = ??


Monday, July 12, 2021

Terraform create S3 bucket example | How to create S3 bucket in AWS using Terraform

Terraform is an infrastructure orchestration tool for creating web services in AWS automatically. You can use Terraform for provisioning any resources in AWS. We will learn how to create S3 bucket in AWS using Terraform.

Watch this on YouTube channel:
Pre-requisites:
You can provision resources in AWS cloud using Terraform by two ways as mentioned below:
  1. AWS Access keys + secret keys (un-secure way)
  2. Create an IAM Role with AmazonS3FullAccess Policy. (more secure way)

Option 2 is recommended approach as we already installed Terraform on EC2 instance that is inside AWS cloud. So we do not need to use Access Keys + secret keys. But if you have installed Terraform on your local machine you would need to go with Option1.

Terraform Script to create S3 bucket in AWS

You can clone the entire code from my GitHub Repo 

Create Terraform variables file

sudo vi variables.tf

variable "aws_region" {
description = "The AWS region to use to create resources."
default = "us-east-2"
}
variable "bucket_prefix" {
type = string
description = "(required since we are not using 'bucket') Creates a unique bucket name beginning with the specified prefix"
default = "my-s3bucket-"
}
variable "tags" {
type = map
description = "(Optional) A mapping of tags to assign to the bucket."
default = {
environment = "DEV"
terraform = "true"
}
}
variable "versioning" {
type = bool
description = "(Optional) A state of versioning."
default = true
}
variable "acl" {
type = string
description = " Defaults to private "
default = "private"
}


Create output.tf file

sudo vi outputs.tf

output "s3_bucket_name" {
  value = aws_s3_bucket.my-s3-bucket.id
}
output "s3_bucket_region" {
    value = aws_s3_bucket.my-s3-bucket.region
}

Create main.tf file

sudo vi main.tf

provider "aws" {
  region = var.aws_region
}
resource "aws_s3_bucket" "my-s3-bucket" {
  bucket_prefix = var.bucket_prefix
  acl = var.acl
  
   versioning {
    enabled = var.versioning
  }
  
  tags = var.tags
}

Execute Terraform commands
Now execute the below command:
terraform init
you should see like below screenshot.


Execute the below command
terraform plan
the above command will show how many resources will be added.
Plan: 1 to add, 0 to change, 0 to destroy.

Execute the below command
terraform apply
Plan: 1 to add, 0 to change, 0 to destroy.

Do you want to perform these actions?
  Terraform will perform the actions described above.
  Only 'yes' will be accepted to approve.

  Enter a value: yes

Apply complete! Resources: 1 added, 0 changed, 0 destroyed.


Now login to AWS--> S3, to see the new bucket created.


If you are having any errors related to credentials make sure you have access to AWS by attaching IAM role with AmazonS3FullAccess or access keys + secret keys are setup.

Friday, July 9, 2021

Ansible Playbook for provisioning a new EC2 instance in AWS | Create new EC2 instance in AWS cloud using Ansible Playbook

We will learn how to create Ansible Playbook for provisioning a new EC2 instance in AWS cloud. Please follow the below steps in the machine where you have installed Ansible.


Watch here for YouTube Video:

Pre-requisites:


Steps to create EC2 instance using Ansible:

Login to EC2 instance using Git bash or ITerm/putty where you installed Ansible. Execute the below command:

Create an Inventory file first

sudo mkdir /etc/ansible

Edit Ansible hosts or inventory file
sudo vi /etc/ansible/hosts
Add the below two lines in the end of the file:
[localhost]
local


cd ~
mkdir playbooks  
cd playbooks

Create Ansible playbook
sudo vi create_ec2.yml 
(copy the below content in green color)
edit the create_jenkins_ec2.yml to make sure you update the key which is red marked below:

---
 - name:  provisioning EC2 instances using Ansible
   hosts: localhost
   connection: local
   gather_facts: False
   tags: provisioning

   vars:
     keypair: myJan2024Key
     instance_type: t2.small
     image: ami-007855ac798b5175e
     wait: yes
     group: webserver
     count: 1
     region: us-east-1
     security_group: my-jenkins-security-grp
   
   tasks:

     - name: Task # 1 - Create my security group
       local_action: 
         module: ec2_group
         name: "{{ security_group }}"
         description: Security Group for webserver Servers
         region: "{{ region }}"
         rules:
            - proto: tcp
              from_port: 22
              to_port: 22
              cidr_ip: 0.0.0.0/0
            - proto: tcp
              from_port: 8080
              to_port: 8080
              cidr_ip: 0.0.0.0/0
            - proto: tcp
              from_port: 80
              to_port: 80
              cidr_ip: 0.0.0.0/0
         rules_egress:
            - proto: all
              cidr_ip: 0.0.0.0/0
       register: basic_firewall
     - name: Task # 2 Launch the new EC2 Instance
       local_action:  ec2 
                      group={{ security_group }} 
                      instance_type={{ instance_type}} 
                      image={{ image }} 
                      wait=true 
                      region={{ region }} 
                      keypair={{ keypair }}
                      count={{count}}
       register: ec2
     - name: Task # 3 Add Tagging to EC2 instance
       local_action: ec2_tag resource={{ item.id }} region={{ region }} state=present
       with_items: "{{ ec2.instances }}"
       args:
         tags:
           Name: MyTargetEc2Instance


now execute the ansible playbook by
ansible-playbook create_ec2.yml


If everything is good, you should see the new instance created on AWS console. make sure you are able to connect to that instance.

That's it!! That is how you create a new EC2 instance using Ansible.

DevOps BootCamp and AWS/Azure Cloud computing Program by Coach AK - FAQs

(More New Topics..New CICD tool included - GitHub Actions!!!!)

1. How many weeks is this DevOps Coaching program ?

    10 weeks program, to know more about the program, click here.

2. It is online or in-person class?

    Classes are currently online only (on Zoom) due to Covid-19

3. What are the schedules for next batches?

    Click here for the schedules

4. Can anyone do this program and become successful? 

    Yes, Absolutely. Any one can do this program and become successful if the person is willing to put the efforts to learn with open minded-ness and ready to follow coach's direction & mentorship and being committed to this program.

5. Do I need to have any experience & knowledge in IT or computer programming?

   Not really, if you have any experience in IT it helps, but it is not mandatory. You can learn basics of Agile or software development life cycle by self learning. 

6. Is the Coaching program lab oriented?

   Yes, purely lab oriented coaching

7. Do I get any help in preparing my resume?

   Yes, the Coach will assist you in preparing your resume.

8. Do I get any help or tips in preparing for the DevOps interview?

   Yes, Coach will provide necessary documents, tips or guidance in preparing for DevOps interview.

9. What is the course fee ?
    $990/person if you make a single payment. Please talk to coach for current offers/promotions.
    for 3 installments you will be paying $395.
 If you live in India, please talk to Coach to get the price in Rs. 

10. What are the modes of payment?
     Zelle, Cash App or PayPal

11. Where will students do the lab exercises?
       You will be learning DevOps, Cloud computing on AWS and Azure Cloud platforms. 

12. What are the different tools covered in this program?
    • Linux basics
    • Git
    • GitHub
    • GitHub Actions
    • BitBucket
    • Jenkins
    • Maven
    • SonarQube 
    • Nexus
    • Artifactory 
    • Slack
    • Terraform
    • Ansible
    • Docker
    • Kubernetes
    • Helm
    • Prometheus
    • Grafana
    • Azure DevOps
    • AWS Cloud
    • Azure Cloud

Thursday, July 8, 2021

How to create EC2 instance using Terraform | EC2 instance Creation using Terraform on AWS using IAM Role | Terraform With AWS Cloud

Terraform is an open-source tool for provisioning and managing cloud infrastructure. Terraform can provision resources on any cloud platform. 

Terraform allows you to create infrastructure in configuration files(tf files) that describe the topology of cloud resources. These resources include virtual machines, storage accounts, networking interfaces, etc.

Please watch steps in YouTube channel:

Pre-requisites:
  • Install Terraform on your EC2 instance.
  • Create an IAM role or access keys/secret keys
You can provision resources in AWS cloud using Terraform by two ways as mentioned below:
  1. AWS Access keys + secret keys (un-secure way)
  2. IAM Role with AmazonEC2FullAccess Policy. (more secure way)
Option 2 is recommended approach as we already installed Terraform on EC2 instance that is inside AWS cloud. So we do not need Access Keys + secret keys. But if you have installed Terraform on your local machine you would need to go with Option1.

We will see how you can use Terraform to provision EC2 instance. Please do the below steps for provisioning EC2 instances on AWS.

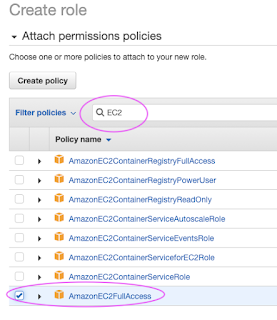
Step - 1 Create an IAM role to provision EC2 instance in AWS 
Go to AWS console, click on IAM


Select AWS service, EC2, Click on Next Permissions


Type EC2 and choose AmazonEC2FullAccess as policy


Click on Next tags, Next Review
give some role name and click on Create role.


Step - 2 Assign IAM role to EC2 instance

Go back to Jenkins EC2 instance, click on EC2 instance, Security, Modify IAM role


Type your IAM role name my-ec2-terraform-role and Save to attach that role to EC2 instance.


Login to EC2 instance where you have installed Terraform.

Step 3 - Create Terraform files

cd ~
mkdir project-terraform
cd project-terraform

Create Terraform Files
make sure you change what ever is high lighted in red color below per your settings.

sudo vi variables.tf

variable "aws_region" {
       description = "The AWS region to create things in." 
       default     = "us-east-1
}

variable "key_name" { 
    description = " SSH keys to connect to ec2 instance" 
    default     =  "myJune2021Key
}

variable "instance_type" { 
    description = "instance type for ec2" 
    default     =  "t2.micro" 
}

variable "security_group" { 
    description = "Name of security group" 
    default     = "my-jenkins-security-group-apr-2024" 
}

variable "tag_name" { 
    description = "Tag Name of for Ec2 instance" 
    default     = "my-ec2-instance" 
variable "ami_id" { 
    description = "AMI for Ubuntu Ec2 instance" 
    default     = "ami-0c7217cdde317cfec
}

Now create main.tf file

sudo vi main.tf

provider "aws" {
  region = var.aws_region
}

resource "aws_vpc" "main" {
  cidr_block = "172.16.0.0/16"
  instance_tenancy = "default"
  tags = {
    Name = "main"
  }
}


#Create security group with firewall rules
resource "aws_security_group" "jenkins-sg-2023" {
  name        = var.security_group
  description = "security group for jenkins"
  ingress {
    from_port   = 8080
    to_port     = 8080
    protocol    = "tcp"
    cidr_blocks = ["0.0.0.0/0"]
  }

 ingress {
    from_port   = 22
    to_port     = 22
    protocol    = "tcp"
    cidr_blocks = ["0.0.0.0/0"]
  }

 # outbound from Jenkins server
  egress {
    from_port   = 0
    to_port     = 65535
    protocol    = "tcp"
    cidr_blocks = ["0.0.0.0/0"]
  }

  tags= {
    Name = var.security_group
  }
}

resource "aws_instance" "myFirstInstance" {
  ami           = var.ami_id
  key_name = var.key_name
  instance_type = var.instance_type
  vpc_security_group_ids = [aws_security_group.jenkins-sg-2023.id]
  tags= {
    Name = var.tag_name
  }
}

# Create Elastic IP address
resource "aws_eip" "myElasticIP" {
  domain      = "vpc"
  instance = aws_instance.myFirstInstance.id
tags= {
    Name = "jenkins_elastic_ip"
  }
}

Step 4 - Execute Terraform Commands
Now execute the below command:
terraform init
you should see like below screenshot.


Execute the below command
terraform plan
the above command will show how many resources will be added.
Plan: 4 to add, 0 to change, 0 to destroy.


Execute the below command
terraform apply
Plan: 4 to add, 0 to change, 0 to destroy.

Do you want to perform these actions?
  Terraform will perform the actions described above.
  Only 'yes' will be accepted to approve.

  Enter a value: yes

Apply complete! Resources: 4 added, 0 changed, 0 destroyed.
Now login to EC2 console, to see the new instances up and running

List of Resources created by Terraform
Execute the below command to view list of the resources created by Terraform.
terraform state list
The above command will list four resources created.


You should be able to see EC2 instance up and running in AWS console.

How to push Terraform files into GitHub
All Terraform files should be checked into version control systems such as GitHub, BitBucket or GitLab. Let us see how to push code changes into GitHub. Make sure you are in the directory where Terraform files are created.

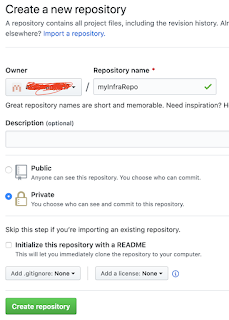
Create Remote repo in GitHub
Create a new repo with below name, make sure it is a private repo. Also do not click on initialize this repository with a README option.

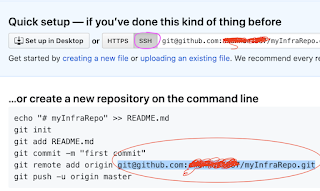
 Note down the remote url under SSH as highlighted below:


Note:
If you have any issues in uploading tf files, you may not have created ssh-keys and uploaded into GitHub. Create ssh keys using ssh-keygen command:

ssh-keygen
This should generate both public and private keys.
Copy the public keys by executing the below command:


sudo cat ~/.ssh/id_rsa.pub

Initialize the directory first
git init

The above command will create local git repository.
Now add terraform files. add only tf files, not other files.
git add *.tf

git commit -m "Added terraform files"

                              Copy the below red highlighted url from
                                    above screenshots circled in red.
git remote add origin your remote repo SSH url per above screenshot, not https url

Now push the code into GitHub
git push -u origin master

Now Login to GitHub to view the Terraform files

You may get this error if you have not uploaded ssh keys into GitHub/BitBucket. try creating SSH keys by executing ssh-keygen command and upload public keys into GitHub.


So make sure you upload SSH keys into your SCM.

What is GitHub Advanced Security for Azure DevOps | Configure GitHub Advanced Security for Azure DevOps

GitHub Advanced Security for Azure DevOps brings the  secret scanning, dependency scanning  and  CodeQL code scanning  solutions already ava...