Tuesday, May 25, 2021

How to create Azure Container Registry using Terraform in Azure Cloud | Setup Azure Container Registry using Terraform

Hashicorp's Terraform is an open-source tool for provisioning and managing cloud infrastructure. Terraform can provision resources on any cloud platform. 

Terraform allows you to create infrastructure in configuration files(tf files) that describe the topology of cloud resources. These resources include virtual machines, storage accounts, and networking interfaces. The Terraform CLI provides a simple mechanism to deploy and version the configuration files to Azure.

Watch the steps in YouTube:

Advantages of using Terraform:
  • Reduce manual human errors while deploying and managing infrastructure.
  • Deploys the same template multiple times to create identical development, test, and production environments.
  • Reduces the cost of development and test environments by creating them on-demand.

How to Authenticate with Azure?

Terraform can authenticate with Azure in many ways, in this example we will use Azure CLI to authenticate with Azure and then we will create resources using Terraform.

Pre-requisites:

Azure CLI needs to be installed.

Terraform needs to be installed.

Logging into the Azure CLI

Login to the Azure CLI using:

az login

The above command will open the browser and will ask your Microsoft account details. Once you logged in, you can see the account info by executing below command:

az account list

Now create a directory to store Terraform files.

mkdir tf-acr

cd tf-acr

Let's create a terraform file to use azure provider. To configure Terraform to use the Default Subscription defined in the Azure CLI, use the below cod.

Create Terraform files

Create variable file first

sudo vi variables.tf

variable "resource_group_name" {
type = string
  description = "RG name in Azure"
}

variable "acr_name" {
type = string
  description = "ACR name in Azure"
}

variable "location" {
type = string
  description = "Resources location in Azure"
}

Define values for variables declared

sudo vi terraform.tfvars
resource_group_name = "rg-tf-acr"
location            = "southcentralus"
acr_name     = "myacrrepo123"

Create main Terraform file

sudo vi main.tf

provider "azurerm" {
  features {}
}
resource "azurerm_resource_group" "rg" {
  name     = var.resource_group_name
  location = var.location
}

resource "azurerm_container_registry" "acr" {
  name     = var.acr_name
  resource_group_name      = azurerm_resource_group.rg.name
  location                 = azurerm_resource_group.rg.location
  sku                      = "Basic"
  admin_enabled            = true
}

output "admin_password" {
  value       = azurerm_container_registry.acr.admin_password
  description = "The object ID of the user"
sensitive = true
}

Perform the below command to initialize the directory.

terraform init

Once directory is initialized, now perform below command to validate terraform files.

terraform validate

Then perform plan command to see how many resources will be created.

terraform plan


terraform apply or terraform apply --auto-approve

Do you want to perform these actions?

type yes 


Now Login into Azure Cloud to see the resources created.


How to destroy the resources ?
Execute terraform destroy

The above command to destroy both resource group and container registry created before.


Sample code is available here in my GitHub repo.


Wednesday, May 12, 2021

How to store Terraform state file in S3 Bucket | How to manage Terraform state in S3 Bucket

By default, Terraform stores state locally in a file named terraform.tfstate. This does not work well in a team environment where if any developer wants to make a change he needs to make sure nobody else is updating terraform in the same time.

With remote state, Terraform writes the state data to a remote data store, which can then be shared between all members of a team. Terraform supports storing state in many ways including the below:

  • Terraform Cloud
  • HashiCorp Consul
  • Amazon S3
  • Azure Blob Storage
  • Google Cloud Storage
  • Alibaba Cloud OSS
  • Artifactory or Nexus 

We will learn how to store state file in AWS S3 bucket. We will be creating S3 bucket and also create Dynamo Table where we will be storing lock.

Watch the steps in YouTube Channel:


Pre-requisites:

Steps:

First setup your access keys, secret keys and region code locally.

Steps to Create Access Keys
  1. Go to the AWS management console, click on your Profile name and then click on My Security Credentials. 
  2. Go to Access Keys and select Create New Access Key. ...
  3. Click on Show Access Key and save the access key and secret access key.
  4. You can also download the keys as well.

Perform below commands where you have installed Terraform:

aws configure

(Provide Access keys, secret keys and region code)

mkdir project-terraform

cd project-terraform

First let us create necessary terraform files.

Create tf files

sudo vi variables.tf

variable "region" {
    default = "us-east-2"
}

variable "instance_type" {
    default = "t2.micro"

sudo vi main.tf
provider "aws" {
  region     = "${var.region}"
}

#1 -this will create a S3 bucket in AWS
resource "aws_s3_bucket" "terraform_state_s3" {
  #make sure you give unique bucket name
  bucket = "terraform-coachdevops-state" 
  force_destroy = true
# Enable versioning to see full revision history of our state files
  versioning {
         enabled = true
        }

# Enable server-side encryption by default
server_side_encryption_configuration {
    rule {
      apply_server_side_encryption_by_default {
        sse_algorithm = "AES256"
      }
    }
  }
}

# 2 - this Creates Dynamo Table
resource "aws_dynamodb_table" "terraform_locks" {
# Give unique name for dynamo table name
  name         = "tf-up-and-run-locks"

  billing_mode = "PAY_PER_REQUEST"
  hash_key     = "LockID"
        attribute {
         name = "LockID"
         type = "S"
      }
}

now let us initialize terraform.

terraform init

terraform apply


this will create two resources - S3 bucket and AWS Dynamo table. But still terraform state file is stored locally. if you type below command, you will see the tfstate file locally.

 ls -al


To store state file remotely, you need to add following code with terraform block. This will add backend configuration.

sudo vi main.tf

#Step 3 - Creates S3 backend
terraform {
  backend "s3" {
    #Replace this with your bucket name!
    bucket         = "terraform-coachdevops-state"
    key            = "dc/s3/terraform.tfstate"
    region         = "us-east-2"
    #Replace this with your DynamoDB table name!
    dynamodb_table = "tf-up-and-run-locks"
    encrypt        = true
    }
}

terraform init 

and then type yes and enter. Now you see local state file has 0 bytes(empty)

Now login to AWS console, Click on S3, Click on the bucket name

Now you should be able to see tfstate file in S3.

Click on the terraform.tfstate file, you can see multiple version of your state file. Terraform is automatically pushing and pulling state data to and from S3.

How to perform Destroy?

It is not that straight forward as back end is referencing S3 bucket, if we delete S3 bucket, back end will not where to reference. So we need to perform below steps to perform destroy:

1. remove back end reference in the main.tf by commenting out backend section of the code.

sudo vi main.tf

remove the below code or comment out:

/*

terraform {
  backend "s3" {
    #Replace this with your bucket name!
    bucket         = "terraform-coachdevops-state"
    key            = "dc/s3/terraform.tfstate"
    region         = "us-east-2"
    #Replace this with your DynamoDB table name!
    dynamodb_table = "tf-up-and-run-locks"
    encrypt        = true
    }
}

*/

We need to initialize again. so type below command

terraform init -migrate-state

type yes

Now you will see the local state file have been updated.

Now perform you can delete all the resources created by Terraform including S3 bucket and Dynamo table.

terraform destroy


Tuesday, May 11, 2021

Why Git is Distributed ? | Advantages of Git | How Git is different from traditional SCM tools?

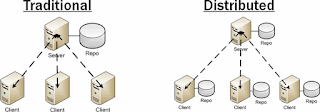
Most of version control systems such as SVN, TFVC or CVS work on client-server model. After making code changes, when developers check-in the code changes, it goes to central server. All history is being maintained in a central server, not locally.

Whereas in Git, developers clone the remote repo into local machine which is called local repo. When they clone in local machine, all history is copied into local repo. After making code changes, when they commit the code, it goes into local repo with new version. Then they can push code changes into remote repo where it is available to others. Client and remote server will have full repository.


Here below is the difference Git and other control systems:

Area Git SVN/TFVC
Repository type Distributed Centralized
Full History Local machine Central machine
Checkout They clone the whole repository and do locally changes Developer checkout working copy which is snapshot of a code
Work Offline Yes No
Branching and Merging Reliable, used often, supports fat forward merge and 3-way merge Reliable, use with caution
Operations speed Fast and most are local Network-dependent
Learning Curve Needs a bit time Relatively simple
Staging area Supported to stash the temporary changes and retrieve it back later Not supported
Collaboration model Repository-to-repository interaction Between working copy and central repo

Friday, May 7, 2021

Deploy Python App into Kubernetes Cluster using kubectl Jenkins Pipeline | Containerize Python App and Deploy into AKS Cluster | Kubectl Deployment using Jenkins

We will learn how to automate Docker builds using Jenkins and Deploy into Kubernetes Cluster(AKS) in Azure Cloud. We will use kubectl command to deploy Docker images into AKS cluster. We will use Python based application. I have already created a repo with source code + Dockerfile. The repo also have Jenkinsfile for automating the following:


- Automating builds using Jenkins
- Automating Docker image creation
- Automating Docker image upload into Docker registry
- Automating Deployments to Kubernetes Cluster using kubectl CLI plug-in


Pre-requistes:
1. AKS Cluster is setup and running. Click here to learn how to create AKS cluster.
2. Jenkins Master is up and running.
3. Docker, Docker pipeline and Kubectl CLI plug-ins are installed in Jenkins


5. Azure container registry is setup in https://portal.azure.com


Step #1 - Create Credentials for Acure Container Registry
Go to Jenkins UI, click on Credentials -->


Click on Global credentials
Click on Add Credentials


Now Create an entry for connecting to ACR. Make sure you enter the ID as ACR


Step #3 - Create Credentials entry for AKS Cluster
Click on Add Credentials, use Kubernetes configuration from drop down.


execute the below command to get kubeconfig info, copy the entire content of the file:
sudo cat ~/.kube/config


Enter ID as K8S and choose enter directly and paste the above file content and save.


Step # 4 - Create a pipeline in Jenkins
Create a new pipeline job.


Step # 5 - Copy the pipeline code from below
Make sure you change red highlighted values below:
Your docker user id should be updated.
your registry credentials ID from Jenkins from step # 1 should be copied


Step # 6 - Build the pipeline
Once you create the pipeline and changes values per your Docker user id and credentials ID, click on 


Step # 7 - Verify deployments to K8S

kubectl get pods


kubectl get deployments
kubectl get services

Steps # 8 - Access Python App in K8S cluster
Once build is successful, go to browser and enter master or worker node public ip address along with port number mentioned above
http://master_or_worker_node_public_ipaddress:port_no_from_above

You should see page like below:


Please watch the above steps in YouTube channel:

Thursday, May 6, 2021

Automate Docker builds using Jenkins Pipelines | Dockerize Python App | Upload Images into Azure Container Registry (ACR)

We will learn how to automate Docker builds using Jenkins. We will use Python based application. I have already created a repo with source code + Dockerfile. We will see how to create Docker image and upload into Azure Container Registry (ACR) successfully.


- Automating builds
- Automating Docker image builds
- Automating Docker image upload into ACR
- Automating Docker container provisioning
 
Watch here for YouTube channel:
 

Pre-requisites:
1. Jenkins is up and running
2. Docker installed on Jenkins instance. Click here to for integrating Docker and Jenkins
3. Docker and Docker pipelines plug-in are installed 
4. Create credentials entry for Jenkins for connecting to ACR
5. Repo created in ACR, Click here to know how to do that.
6. port 8096 is opened up in firewall rules. 

Step # 1 - Create a pipeline in Jenkins
Name as myACRDockerPipelineJob


Step # 2 - Copy the pipeline code from below
Make sure you change red highlighted values below:
Your a should be updated and repo should be updated.
pipeline {
     agent any
     
        environment {
        //once you create ACR in Azure cloud, use that here
        registryName = "myakacrregistry/my-python-app"
        //- update your credentials ID after creating credentials for connecting to ACR
        registryCredential = 'ACR'
        dockerImage = ''
        registryUrl = 'myakacrregistry.azurecr.io'
    }
    
    stages {

        stage ('checkout') {
            steps {
            checkout([$class: 'GitSCM', branches: [[name: '*/master']], doGenerateSubmoduleConfigurations: false, extensions: [], submoduleCfg: [], userRemoteConfigs: [[url: 'https://github.com/akannan1087/myPythonDockerRepo']]])
            }
        }
       
        stage ('Build Docker image') {
            steps {
                
                script {
                    dockerImage = docker.build registryName
                }
            }
        }
       
    // Uploading Docker images into ACR
    stage('Upload Image to ACR') {
     steps{   
         script {
            docker.withRegistry( "http://${registryUrl}", registryCredential ) {
            dockerImage.push()
            }
        }
      }
    }

       // Stopping Docker containers for cleaner Docker run
     stage('stop previous containers') {
         steps {
            sh 'docker ps -f name=mypythonContainer -q | xargs --no-run-if-empty docker container stop'
            sh 'docker container ls -a -fname=mypythonContainer -q | xargs -r docker container rm'
         }
       }
      
    stage('Docker Run') {
     steps{
         script {
                sh 'docker run -d -p 8096:5000 --rm --name mypythonContainer ${registryUrl}/${registryName}'
            }
      }
    }
    }
 }
 
Step # 3 - Click on Build - Build the pipeline
Once you create the pipeline and changed values per your ACR details, click on Build now.

Steps # 4 - Check Docker images are uploaded into ACR
Login to ACR in Azure cloud, click on your registry name, Services, Repositories, now you should see the image got uploaded.


Steps # 5 - Access PythonApp in the browser which is running inside docker container
Once build is successful, go to browser and enter http://public_dns_name:8096
You should see page like below:


How to Configure GitHub Advanced Security for Azure DevOps | How to Perform Security scan for Azure Repos using GitHub Advanced Security

GitHub Advanced Security for Azure DevOps brings the  secret scanning, dependency scanning  and  CodeQL code scanning  solutions already ava...