Sunday, November 29, 2020

How to setup Elastic Container Registry (ECR) for Docker on AWS | How to Create a Repo in ECR for Hosting Docker images | How to Push Docker image into Amazon ECR

Amazon ECR uses Amazon S3 for storage to make your container images highly available and accessible, allowing you to reliably deploy new containers for your applications. Amazon ECR transfers your container images over HTTPS and automatically encrypts your images at rest. Amazon ECR is integrated with Amazon Elastic Container Service (ECS), simplifying your development to production workflow.


What are we going to do in this lab?
1. Create a Repository in AWS ECR
2. Create an IAM role with AmazonEC2ContainerRegistryFullAccess policy.
3. Assign the role to EC2 instance
4. Download pythonApp from Github.
5. Build docker image for the Python App
6. Tag & push docker image to ECR
7. Run python app in Docker container

Pre-requisites:
  • Ec2 instance up and running with Docker installed
  • Make sure you open port 8081
Step 1 - Create a repo in ECR 

Go to AWS console and search for ECR

Click on Create Repository


Enter name for your repo - all lower case and Click create repository


Once repo is created, choose the repo and click on view push commands. Note down the account ID


Note the URL from step # 3 below, this will be used for tagging and pushing docker images into ECR.

That's it, you have created repo successfully. Let us create docker images and push it to above repo in ECR.

Step 2-  Create an IAM role
You need to create an IAM role with AmazonEC2ContainerRegistryFullAccess policy.
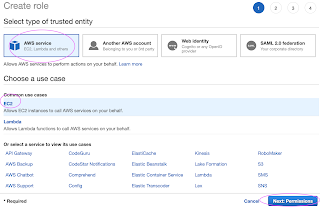
Go to AWS console, IAM, click on Roles. create a role


Select AWS services, Click EC2, Click on Next permissions.
 
 Now search for AmazonEC2ContainerRegistryFullAccess policy and click


Skip on create tag.
Now give a role name and create it.


Step 3 - Assign the role to EC2 instance

Go to AWS console, click on EC2, select EC2 instance, Choose instance setting.
Click on Attach/Replace IAM Role


Choose the role you have created from the dropdown.
Select the role and click on Apply.

Now Login to EC2 instance where you have installed Docker. You must be able to connect to AWS ECR through AWS CLI which can be installed by

sudo apt  install awscli -y

Once AWS CLI is installed, you can verify the installation:
aws --version
Now you can login to AWS ECR using CLI:
aws ecr get-login-password --region us-east-2 | docker login --username AWS --password-stdin your_acct_id.dkr.ecr.us-east-2.amazonaws.com

Where your_acct_id is from AWS ECR in the above picture.

You must get a message says Login succeeded. Now let's build a docker image, I have already created a public repo in Bitbucket. All you need to do is perform the below command to clone my repo:

Step 4 - Download GitHub Repo
git clone https://bitbucket.org/ananthkannan/mydockerrepo; cd mydockerrepo/pythonApp

Step 5 - Build Docker image
docker build . -t mypythonapp

the above command will build a docker image.
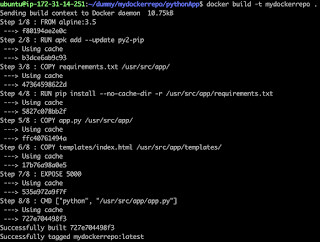
 

Now tag Docker image you had build
docker tag mypythonapp:latest your_acct_id.dkr.ecr.us-east-2.amazonaws.com/your-ecr-repo-name:latest


You can view the image you had built.


Step 6 - Push Docker image into AWS ECR

docker push your_acc_id.dkr.ecr.us-east-2.amazonaws.com/your-ecr-repo-name:latest
Now you should be able to login to ECR and see the images already uploaded.
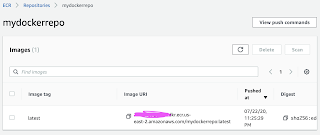


Step 7 - Run Docker container from Docker image

sudo docker run -p 8081:5000 --rm --name myfirstApp1  your_acc_id.dkr.ecr.us-east-2.amazonaws.com/your-ecr-repo-name


Note: You can also create a ECR repo through AWS CLI command in AWS ECR.

aws ecr create-repository --repository-name myawesome-repo --region us-east-2

You can watch the steps on YouTube:


How to fix Jenkins Error | Incorrect Java 11 version

You may have this issue when trying to install Jenkins with default JDK version(Java 11) in Ubuntu 18.0.4. We need to fix by installing JDK 8.

Remove Jenkins first.

sudo apt-get remove jenkins -y
 

Install Java 8 version

sudo apt-get install openjdk-8-jdk -y


Now choose which version to select from both Java 11 and Java 8 
sudo update-alternatives --config java
type 2 to choose Java 8 version.

Check Java version after setting:

Install Jenkins

sudo apt-get install jenkins -y
Now try to access Jenkins in the browser.

Code error 403 when trying to access Kubernetes cluster | Jenkins Kubernetes Deployment

When ever you are doing deployment from Jenkins to EKS cluster, you may get this error:

Api call failed with code 403, detailed message: {
  "kind": "Status",
  "apiVersion": "v1",
  "metadata": {
    
  },

"status": "Failure",
  "message": "namespaces is forbidden: User \"system:anonymous\" cannot list namespaces at the cluster scope",
  "reason": "Forbidden",
  "details": {
    "kind": "namespaces"
  },
  "code": 403 
Work around or the fix: 

You get this error because you're getting blocked by RBAC policies. Basically, RBAC policies set to restrict the resources you use and limits a few of your action. 

There are two possibilities, either you haven't created an RBAC or it's somehow restricting the cluster access.

By default, your clusterrolebinding has system:anonymous set which blocks the cluster access.

Execute the following command, it will set a clusterrole as cluster-admin which will give you the required access.

kubectl create clusterrolebinding cluster-system-anonymous --clusterrole=cluster-admin --user=system:anonymous


Wednesday, November 25, 2020

Deploy Python App into Kubernetes Cluster using kubectl in Jenkins Pipeline | Containerize Python App and Deploy into Kubernetes Cluster

 We will learn how to automate Docker builds using Jenkins and Deploy into Kubernetes Cluster. We will use Python based application. I have already created a repo with source code + Dockerfile. The repo also have Jenkinsfile for automating the following:


- Automating builds using Jenkins
- Automating Docker image creation
- Automating Docker image upload into Docker registry
- Automating Deployments to Kubernetes Cluster
 
Pre-requisites:
1. Jenkins Master is up and running. 
2. Spin up Jenkins slave, install docker in it. Install kubectl on Slave.
3. Docker, Docker pipeline and Kubernetes Deploy plug-ins are installed in Jenkins


4. Docker hub account setup in https://cloud.docker.com
5. Kubernetes Cluster is setup and running.

Step #1 - Login to Jenkins slave instance through command line - Install Docker

sudo apt install docker.io -y
 
Add Jenkins to Docker Group
sudo usermod -aG docker jenkins

sudo systemctl daemon-reload
 
Restart Docker service
sudo systemctl start docker
sudo systemctl enable docker
sudo systemctl restart docker


Restart Jenkins service
sudo service jenkins restart
 
Install kubectl command on Jenkins slave.

Step #2 - Create Credentials for Docker Hub
Go to Jenkins UI, click on Credentials -->


Click on Global credentials
Click on Add Credentials


Now Create an entry for your Docker Hub account. Make sure you enter the ID as dockerhub

Step #3 - Create Credentials for Kubernetes Cluster
execute the below command to get kubeconfig info, copy the entire content of the file:
sudo cat ~/.kube/config

Go to Jenkins, Manage Jenkins, Click on Add Credentials, use Kubernetes configuration from drop down.
Enter ID as kubeconfig_raw and upload kubeconfig file


 Click on browse
Upload kube config and enter id as ID kubeconfig-raw

Step # 4 - Create a pipeline in Jenkins
Create a new pipeline job.


Step # 5 - Copy the pipeline code from below
Make sure you change red highlighted values below:
Your docker user id should be updated.
your registry credentials ID from Jenkins from step # 1 should be copied

pipeline {
     agent {
         label 'myslave'
     }
        environment {
        //once you sign up for Docker hub, use that user_id here
        registry = "your_docker_hub_user_id/mypython-app"
        //- update your credentials ID after creating credentials for connecting to Docker Hub
        registryCredential = 'dockerhub'
        dockerImage = ''
    }
    stages {

        stage ('checkout') {
            steps {
            checkout([$class: 'GitSCM', branches: [[name: '*/master']], doGenerateSubmoduleConfigurations: false, extensions: [], submoduleCfg: [], userRemoteConfigs: [[url: 'https://github.com/akannan1087/myPythonDockerRepo']]])
            }
        }
       
        stage ('Build docker image') {
            steps {
                script {
                dockerImage = docker.build registry
                }
            }
        }
       
         // Uploading Docker images into Docker Hub
    stage('Upload Image') {
     steps{   
         script {
            docker.withRegistry( '', registryCredential ) {
            dockerImage.push()
            }
        }
      }
    }
   
       stage('K8S Deploy') {
        steps{   
            script {
                withKubeConfig([credentialsId: 'kubeconfig-raw', serverUrl: '']) {
                sh ('kubectl apply -f k8s-deployment.yaml')
                }
            }
        }
       }
  
    }  
}

Step # 6 - Build the pipeline
Once you create the pipeline and changes values per your Docker user id and credentials ID, click on 

Step # 7 - Verify deployments to K8S

kubectl get pods


kubectl get deployments
kubectl get services

Steps # 8 - Access Python App in K8S cluster
Once build is successful, go to browser and enter master or worker node public ip address along with port number mentioned above
http://master_or_worker_node_public_ipaddress:port_no_from_above

You should see page like below:


Tuesday, November 24, 2020

How to set up SSH keys in Azure Repos | Setup Java Web App in Azure Git in Azure DevOps using Maven

How to set up SSH keys in Azure Repos and Setup WebApp in Azure Repo


Pre-requisites:
  • Git client installed on your source or local machine.
Steps:

Go to your visual studio home page. You should be able to go by clicking on the below URL.
https://dev.azure.com/

Create a new project by clicking on New project and enter project details like below. This will create a project dashboard.


Once project is created, Click on Repos.


 Click on initialize link to add README.


Click on clone link on the top right hand side.
Click on SSH link
Click Manage SSH keys

Click Add

Go to any virtual machine you had setup that has both Java and Maven installed. If you would like to know how to create a Virtual Machine in Azure Cloud, click here to do so.

Login to your VM

Create the SSH keys by executing the below command:
(If you already have keys generated, you can overwrite it or skip to next step to copy keys)
ssh-keygen

execute the below command to copy the keys:

cat ~/.ssh/id_rsa.pub

Add the public keys.
Once keys added into Azure DevOps, go to Repos, copy the SSH clone url

Go to your machine where you have installed Java, Maven, preferably your EC2. Execute this command:
git clone <ssh_url>

This should download the empty repo from Azure DevOps to local machine(or ec2).
now after cloning, it will create a folder with repo name..

type 

ls -al to see the folder name after you cloned.

go inside that folder by
cd reponame

Install Maven
sudo apt install maven -y 

Now create the maven project executing the below command:
mvn archetype:generate -DgroupId=com.cf -DartifactId=MyAwesomeApp -DarchetypeArtifactId=maven-archetype-webapp -DinteractiveMode=false

type git status --> to see the newly created project
git add *
git status

git commit -m "my first project check-in to Azure Git"
git push

Now go to Azure DevOps, Select the Repos —> Files —> you should see the project uploaded here.
 

Please watch the above steps on YouTube video:

What is GitHub Advanced Security for Azure DevOps | Configure GitHub Advanced Security for Azure DevOps

GitHub Advanced Security for Azure DevOps brings the  secret scanning, dependency scanning  and  CodeQL code scanning  solutions already ava...