Azure DevOps (previously known as VSTS) is Microsoft's cloud based offering for any technology stack, any platform to turn idea into a product. You can migrate any applications into Azure by building pipelines in Azure Devops.
Click here to learn about Azure DevOps offerings.
Building pipelines in Azure DevOps is really easy, you can migrate your web application code from any where into Azure Cloud by using Azure pipelines.
Creating WebApp in Azure Cloud
You need to create WebApp in Azure Cloud. WebApp is an App service (mostly Platform as a Service) provide by Azure Cloud to migrate any web applications.
Click here to learn how to create WebApp in Azure Portal.
Creating Azure pipelines in Azure DevOps
1. Now go to your visual studio project page --> https://dev.azure.com/
Select the Project dashboard you already created.
Click on Pipelines, Builds.
2. Click on New pipeline and click on use the classic editor to create a pipeline without YAML
3. Select source repository as GitHub and click Authorize using OAuth
4. Now click on Authorize Azure Pipelines, enter GitHub password if it asks.
5. Now you should be able to select repositories by clicking ... dots
6. Since our application is Java stack, type Java and Choose Azure WebApp for Java
7. Click on pipeline name and re-name per your naming standard
8. Modify maven goal as clean install and also choose POM.xml by clicking on three dots ...
9. Leave the value as it is for Copy Files to staging folder
10. Leave the value as it is for Publish Artifact: Drop
11. Click on Stop Azure WebApp step, Enter Azure WebApp details - where you would like to deploy your app in Azure. Select Free trial subscription from the drop down.
12. Do the same in Deploy Azure WebApp & Start Azure WebApp steps.
Enable Webhooks in Pipeline
11. Click on Triggers and then enable check box for Continuous Integration
12. Now click on Save and Queue
13. If your configurations are correct, you should be able to see the build success and able to access in the Azure. Click on Pipelines and pipeline name
Now you will see that Azure DevOps would have started build.
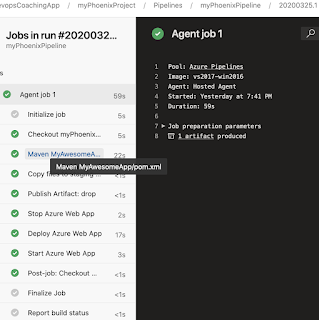
14. Make sure build is success, it should have all green like below.
After successful build, you can check the output by accessing below URL:
https://myAzureWebAppUrl/MyWebApp


Needed to post you that bit of note to be able to give thanks over again about the awesome concepts you’ve documented in this case. This is so surprisingly open-handed with you to offer without restraint all that a few people would have marketed as an e-book to earn some cash for themselves, especially considering the fact that you might well have done it in case you considered necessary. The smart ideas likewise served like the easy way to realize that other individuals have the identical desire the same as my own to realize a great deal more on the subject of this problem. I’m sure there are thousands of more enjoyable times up front for folks who take a look at your site. and other similar anchor texts like above
ReplyDeleteIn most cases the software must be configured in an environment by where customers are able to access multiple applications simultaneously. free restream review
ReplyDeleteHi there everyone, basically showing up to point out that the article is quite interesting, whilst there happen to be some fairly odd feedback. top 3 assignment company
ReplyDelete