| Ansible | Puppet | |
|---|---|---|
| Introduced | 2012 | 2005 |
| Written in? | Python | Java & Ruby |
| Syntax | Playbooks(YAML file) | Domain specific language |
| Model | Push | Pull |
| Architecture | Agent-less | Client/server |
| Deployments | Fast, simple deployments | Larger, complex deployments |
| Commercial version | Ansible Tower | Puppet Enterprise |
| Scheduling | not supported in free version | Default time 30 mins in Open Source puppet |
Hands on DevSecOps Coaching that is provided on AWS and Azure Cloud platforms. Contact Coach AK at devops.coaching@gmail.com for more info. You can also reach out to Coach AK at +1(469) 733-5248
Thursday, October 22, 2020
Ansible Vs Puppet - What is the difference between Ansible and Puppet
Wednesday, October 14, 2020
Install Helm 2 on Linux - Setup Helm 2 on Linux | Install Helm 2 on Ubuntu | Setup Helm 2 on Linux
What is Helm?
Helm is a package manager for Kubernetes. Helm is the K8s equivalent of yum or apt. It accomplishes the same goals as Linux system package managers like APT or YUM: managing the installation of applications and dependencies behind the scenes and hiding the complexity from the user.
Helm helps you manage Kubernetes applications. Helm Charts helps you define, install, and upgrade even the most complex Kubernetes application. Charts are easy to create, version, share, and publish.
Helm is made of two components: the CLI binary named helm that allows you to perform communication with a remote component, named tiller that lives inside your Kubernetes cluster that is responsible to perform patches and changes to resources you ask to manage.
Helm 2 can be installed by below way:
sudo curl -LO https://git.io/get_helm.sh
provide permission
sudo chmod 700 get_helm.sh
Execute script to install
sudo ./get_helm.sh

Verify installation
helm version --client
kind: ServiceAccount
metadata:
name: tiller
namespace: kube-system
---
apiVersion: rbac.authorization.k8s.io/v1beta1
kind: ClusterRoleBinding
metadata:
name: tiller
roleRef:
apiGroup: rbac.authorization.k8s.io
kind: ClusterRole
name: cluster-admin
subjects:
- kind: ServiceAccount
name: tiller
namespace: kube-system
EOF
Tuesday, October 13, 2020
Install eksctl on Linux Instance | How to install eksctl in Ubuntu
eksctl is a command line tool for working with EKS clusters that automates many individual tasks.
The eksctl tool uses CloudFormation under the hood, creating one stack for the EKS master control plane and another stack for the worker nodes.
Download and extract the latest release of eksctl with the following
command.
curl --silent --location "https://github.com/weaveworks/eksctl/releases/latest/download/eksctl_$(uname -s)_amd64.tar.gz" | tar xz -C /tmp
Move the extracted binary to /usr/local/bin.
sudo mv /tmp/eksctl /usr/local/bin
eksctl version
Install the AWS CLI version 2 on Linux | How to Install the AWS CLI version 2 on Linux
Follow these steps from the command line to install the AWS CLI on Linux.
curl "https://awscli.amazonaws.com/awscli-exe-linux-x86_64.zip" -o "awscliv2.zip"
sudo apt install unzip
sudo unzip awscliv2.zip
sudo ./aws/install
aws --version
it should display the below outout.
Install kubectl on Ubuntu Instance | How to install kubectl in Ubuntu
Kubernetes uses a command line utility called kubectl for communicating with
the cluster API server. It is tool for controlling Kubernetes clusters. kubectl looks for a file named config in the $HOME directory.
How to install Kubectl in Ubuntu instance
Monday, October 12, 2020
Create Amazon EKS cluster by eksctl | How to create Amazon EKS cluster using EKSCTL | Create EKS Cluster in command line
What is Amazon EKS
Amazon EKS is a fully managed container orchestration service. EKS allows you to quickly deploy a production ready Kubernetes cluster in AWS, deploy and manage containerized applications more easily with a fully managed Kubernetes service.
EKS takes care of Master node/control plane. We need to manage worker nodes.
Please watch the steps in YouTube channel:
Pre-requisites:
You can use Windows, Macbook or any Ubuntu or Red Hat EC2 instance to setup the below tools.
-
Install AWS CLI – Command line tools for working with AWS services, including Amazon EKS.
-
Install eksctl– A command line tool for working with EKS clusters that automates many individual tasks. -
install kubectl – A command line tool for working with Kubernetes clusters.
Create AWS Access Keys
aws configure
command is the fastest way to set up your AWS CLI installation for general
use.
Make sure you do not have any IAM role attached to the EC2 instance. You can remove IAM role by going into AWS console and Detach the IAM role.
aws configure
the AWS CLI prompts you for four pieces of information:
access key,
secret access key,
AWS Region, and
output format.
Create EKS Cluster using eksctl
eksctl create cluster --name demo-eks --region us-east-2 --nodegroup-name my-nodes --node-type t3.small --managed --nodes 2
the above command should create a EKS cluster in AWS, it might take 15 to 20 mins. The eksctl tool uses CloudFormation under the hood, creating one stack for the EKS master control plane and another stack for the worker nodes.
eksctl get cluster --name demo-eks --region us-east-2
This should confirm that EKS cluster is up and running.
Connect to EKS cluster
kubectl get nodes
kubectl get ns
Deploy Nginx on a Kubernetes Cluster
Let us run some apps to make sure they are deployed to Kuberneter cluster.
The below command will create deployment:
kubectl create deployment nginx --image=nginx
View Deployments
kubectl get deployments
Delete EKS Cluster using eksctl
eksctl delete cluster --name demo-eks --region us-east-2
the above command should delete the EKS cluster in AWS, it might take a few mins to clean up the cluster.
Errors during Cluster creationeksctl delete cluster --name demo-eks --region us-east-2
Saturday, October 10, 2020
Jenkins Pipelines - Pipeline as a code - Difference between Scripted and Declartive Pipelines
Jenkins is an Open source, Java-based automation tool. This tool
automates the Software Integration and delivery process called
Continuous Integration and Continuous Delivery.
Jenkins pipeline
- Pipelines are better than freestyle jobs, you can write a lot of complex tasks using pipelines when compared to Freestyle jobs.
- You can see how long each stage takes time to execute so you have more control compared to freestyle.
- Pipeline is groovy based script that have set of plug-ins integrated for automating the builds, deployment and test execution.
- Pipeline defines your entire build process, which typically includes stages for building an application, testing it and then delivering it.
- You can use snippet generator to generate pipeline code for the stages you don't know how to write groovy code.
- Pipelines are two types - Scripted pipeline and Declarative pipeline
Jenkins Pipeline execution engine supports two DSL syntaxes: Scripted Pipeline and Declarative Pipeline.
Type of Jenkins Pipelines
- Scripted pipeline
- Declarative pipeline
- Scripted pipeline is traditional way of writing pipeline using groovy scripting in Jenkins UI.
- stricter groovy syntax
- each stage can not be executed in parallel in multiple build agents(Slaves) that easily.
- Code is defined within a node block
// Scripted pipeline
node {
stage('Build') {
echo 'Building....'
}
stage('Test') {
echo 'Building....'
}
stage('Deploy') {
echo 'Deploying....'
}
}
Declarative Pipeline (Jenkinsfile)
- New feature added to Jenkins where you create a Jenkinsfile and check in as part of SCM such as Git.
- simpler groovy syntax
- Code is defined within a 'pipeline' block
- each stage can be executed in parallel in multiple build agents(Slaves)
// Declarative pipeline
pipeline {
agent { label 'slave-node' }
stages {
stage('checkout') {
steps {
git 'https://bitbucket.org/myrepo''
}
}
stage('build') {
tools {
gradle 'Maven3'
}
steps {
sh 'mvn clean test'
}
}
}
}
Tuesday, October 6, 2020
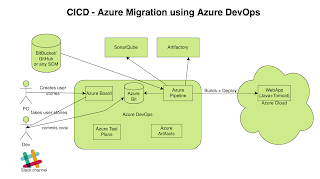
How to migrate apps from bitbucket to azure cloud using Azure DevOps pipelines | How to build pipelines in Azure DevOps to migrate Java Apps to Azure Cloud

We are going to migrate Java Web App that was setup in BitBucket into Azure Cloud. Since it is a Java WebApp, we need to create a WebApp in Azure Cloud.
How are we going to do?
Once you sign in to Azure Portal, you need to create an app service which is a WebApp.
Step # 1- Creating a WebApp in Azure Portal
1. Now login to https://portal.azure.com
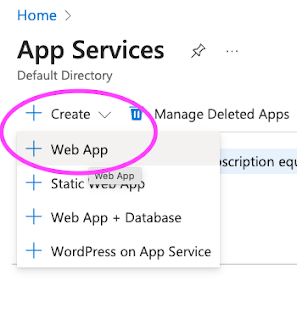
2. Click on App services
3.Click on + Add or click on Create app service(Web App)

Click on Web App. Choose your Azure subscription, usually Pay as you Go or Free trial subscription
Create a new resource group(for first time if you are creating an appservice, otherwise you can use existing group)
Operating System as Linux
Region as Central US or where ever you are based at
Enter LinuxPlan name
Choose SKU and size as given below:
Choose DEV/Test and use 1 GB or 1.75 GB memory
Now click on Apply & Create
This will take bit time to create the app service.
Once WebApp is created, go resources, click on WebApp name and click on the URL.
You should see the app service home page some thing like below:
Since our WebApp is up and running, now we can start creating pipelines to migrate to Azure cloud.
2. Creating pipelines in Azure Devops
1. Now go to your visual studio project page --> https://dev.azure.com/
Select the Project dashboard you already created.
Click on Pipelines, Builds.
2. Click on New pipeline and click on use the classic editor to create a pipeline without YAML
6. Modify maven goal as clean install and also choose POM.xml by clicking on three dots ...choose pom.xml
8. Leave the value as it is for Publish Artifact: Drop
9. Click on Stop Azure WebApp step, Enter Azure WebApp details - where you would like to deploy your app in Azure. Select Free trial subscription from the drop down. Click on Authorize button.
Make sure you disable popup blocker.
10. Do the same in Deploy Azure WebApp & Start Azure WebApp steps.
Enable Webhooks in Pipeline
11. Click on Triggers and then enable check box for Continuous Integration
12. Now click on Save and Queue
13. If your configurations are correct, you should be able to see the build success and able to access in the Azure. Click on Pipelines and pipeline name
Now you will see that Azure DevOps would have started build.
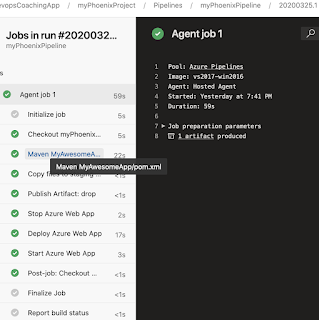
14. Make sure build is success, it should have all green like below.

After successful build, you can check the output by accessing the URL of WebApp:
You can watch the above steps in action in YouTube video:
Friday, October 2, 2020
Migrate WebApp from GitHub to Azure Cloud | Build Pipelines in Azure DevOps to migrate WebApp from GitHub to Azure Cloud
Azure DevOps (previously known as VSTS) is Microsoft's cloud based offering for any technology stack, any platform to turn idea into a product. You can migrate any applications into Azure by building pipelines in Azure Devops.
Building pipelines in Azure DevOps is really easy, you can migrate your web application code from any where into Azure Cloud by using Azure pipelines.
Click here to learn how to create WebApp in Azure Portal.
Creating Azure pipelines in Azure DevOps
1. Now go to your visual studio project page --> https://dev.azure.com/
Select the Project dashboard you already created.
Click on Pipelines, Builds.
2. Click on New pipeline and click on use the classic editor to create a pipeline without YAML
7. Click on pipeline name and re-name per your naming standard
8. Modify maven goal as clean install and also choose POM.xml by clicking on three dots ...
10. Leave the value as it is for Publish Artifact: Drop
11. Click on Stop Azure WebApp step, Enter Azure WebApp details - where you would like to deploy your app in Azure. Select Free trial subscription from the drop down.
12. Do the same in Deploy Azure WebApp & Start Azure WebApp steps.
Enable Webhooks in Pipeline
11. Click on Triggers and then enable check box for Continuous Integration
12. Now click on Save and Queue
13. If your configurations are correct, you should be able to see the build success and able to access in the Azure. Click on Pipelines and pipeline name
Now you will see that Azure DevOps would have started build.
14. Make sure build is success, it should have all green like below.
After successful build, you can check the output by accessing below URL:
https://myAzureWebAppUrl/MyWebApp
DevSecOps Bootcamp Feb 2025 Schedule | DevOps & AWS Azure Cloud Coaching by Coach AK | DevSecOps and Cloud Computing Online Classes
🚀 Join the Ultimate DevSecOps Bootcamp – February 2025! 🔥 Are you ready to supercharge your career in DevSecOps ? Whether you're a ...
-
Let us learn how to create and configure a Self-Hosted Agent in Azure DevOps (ADO). What is an Agent? An agent is computing infrastructure w...
-
(More New Topics..New tools added such as GitHub Actions, Helm, GitHub Advanced Security and Trivy Scanner included ) Here is the coaching ...
-
What is Amazon EKS Amazon EKS is a fully managed container orchestration service. EKS allows you to quickly deploy a production ready Kubern...


