Monday, February 18, 2019

How to Configure webhooks in GitHub | How to trigger Jenkins jobs instantly? - GitHub Webhooks Example

Webhooks allows developers to triggers jobs in CI server (such as Jenkins) for every code changes.

Pre-Requistes:

Make sure you install GitHub integration plug-in in Jenkins

1. Go to Jenkins, Create a job. If you already have a existing job, click on configure. Go to build triggers section and choose the below option - GitHub hook trigger for GitScm pooling.


2. Now go to GitHub, choose your repository. Click on settings, Webhooks.

3. Click on Add web hook.

4. Go Jenkins, copy the URL from the browser--> http://jenkins_public_dns_name:8080

5. Now enter Jenkins URL, select just push event, click on active. Click on Add webhook
6. Now go and make some code changes in your repo in GitHub

7. If you look in Jenkins, you will see job is getting triggered immediately.


You can watch these steps as video on my YouTube channel as well:

Saturday, February 16, 2019

How to implement CICD using Jenkins | Create Freestyle job in Jenkins | How to create build job in Jenkins to automate build and deployment of Java WAR file into Tomcat

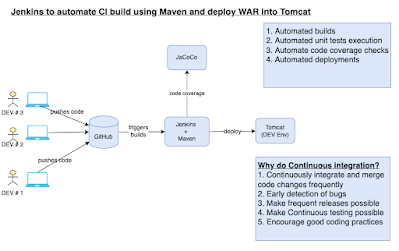
Jenkins is popular open source Continuous integration tool. It was written entirely in Java. Jenkins is a self-contained automation server used for automating builds, tests and deployment.

See below the steps for configuring Jenkins to automate the build and deployment for the Java project we already set up in GitHub.


pre-requisites:
  • Also install deploy to container Jacoco plugins under Jenkins --> Manage Jenkins --> Manage plug-ins

Click on Available, type Deploy to container, select it. enter Jacoco, select it. Click on Install without restart.

Deploy to container


JaCoCo

Click on without restart.


steps to automate MyWebApp project in Jenkins:

1. Login to Jenkins. Click on New item.

2. Enter an item name --> select Free style project.
enter name as myFirstAutomateJob. click OK.
3. under source code mgmt, click git. enter Bitbucket URL or GitHub URL
Click on your repo, Copy the url from the browser. Paste the url as Repository URL below.


under credentials --> click Add- > select Jenkins -->  enter your GitHub username and Personal Access Token as password. DO NOT use Git Hub password as it is removed from August 13, 2021. Click to here to learn how to generate Personal Access Token. Add description as my SCM credentials.

Enter main as branch specifier or which ever branch you want to check out.

4. select that from drop down.
5. under build trigger click on poll scm, enter this value to check

for every 2 mins --> H/02 * * * *

6. Build --> Add build step --> invoke top level maven targets -->

select Maven3 from drop down and goal as clean install


7. Click on advanced, enter the path of POM file as --> MyWebApp/pom.xml


8. click on Add post build action, select Record Jacoco Code coverage report
  
9. click on Add post build action, select deploy war/ear to container.

      for WAR/EAR files enter as 
          **/*.war


in WAR/EAR files, leave context path empty

   10. click on Add container , select Tomcat 9.x

   11. click on add credentials, enter tomcat as user name and password as password.
      select it from drop down.


13. tomcat url should be --> http://your_public_dns_name:8080


click Apply, click Save
click on build now..It should build.
if there is any error, please check the console output. Most of the common error would be checking the path of Maven installation, valid credentials for GitHub or Tomcat. Also make sure you install the plug-ins.

After successful deployment, please make sure you check the output in Tomcat by going to browser and enter below URL

You should see Hello World!!!

This is how you automate the builds and deployments using Jenkins. Please watch the steps in YouTube channel:


Friday, February 15, 2019

How to setup Jenkins on Redhat Enterprise Linux? Jenkins installation on RedHat Linux - Install Jenkins on RedHat Linux

Here are the steps for installing Jenkins on RedHat Enterprise Linux.

You need to setup Java first.

Make sure you have installed wget.

sudo yum install wget -y

Java Installation

Download Java from Oracle site.

sudo wget --no-check-certificate --no-cookies --header 'Cookie: oraclelicense=accept-securebackup-cookie' 'http://download.oracle.com/otn-pub/java/jdk/8u141-b15/336fa29ff2bb4ef291e347e091f7f4a7/jdk-8u141-linux-x64.rpm'


Install from RPM
sudo  rpm -i jdk-8u141-linux-x64.rpm

Add Jenkins repository to yum repository

sudo wget -O /etc/yum.repos.d/jenkins.repo http://pkg.jenkins-ci.org/redhat/jenkins.repo
sudo rpm --import https://jenkins-ci.org/redhat/jenkins-ci.org.key

Install Jenkins
sudo yum install jenkins -y

Start Jenkins
sudo service jenkins start
sudo service jenkins status

You should see below message. that confirms that Jenkins is up and running.
 jenkins.service - LSB: Jenkins Automation Server
   Loaded: loaded (/etc/rc.d/init.d/jenkins; bad; vendor preset: disabled)
   Active: active (running) since Fri 2018-06-08 19:41:28 UTC; 4min 34s ago
     Docs: man:systemd-sysv-generator(8)
  Process: 15404 ExecStart=/etc/rc.d/init.d/jenkins start (code=exited, status=0/SUCCESS)
   CGroup: /system.slice/jenkins.service

Get Jenkins Admin Password
sudo cat /var/lib/jenkins/secrets/initialAdminPassword

Copy the output of the above command.
Now go to browser and access the Jenkins page.

http://your_server_name:8080

Your page will look something like this. Now paste the password into the below Administrator password text box.
Press Continue..Click on install suggested plug-ins..

That's it Jenkins is successfully installed..


Thursday, February 14, 2019

How to integrate SonarQube and Jenkins - Jenkins SonarQube integration

Here below are the steps for integrating SonarQube with Jenkins:
Pre-requisites: Make sure SonarQube is up and running and do the below steps:
Make sure Sonarqube plug-in installed in Jenkins

1. You need to login to SonarQube using admin/admin and click on administration, security, users, click on Tokens, under generate token. Give some value for token name and click on generate. Copy the token.


2. After installing SonarQube successfully, login to Jenkins. Manage Jenkins --> Configure System --> SonarQube installation


Enter name, URL as http://localhost:9000, paste the token you copied from step #1
3. Click on Enable injection of Sonarqube server configuration.
4. Save.
5. Click on your existing free style job, click on configure. click on prepare Sonarqube scanner  environment.


6. enter maven goal as clean install sonar:sonar


7. click on save and build the job.

You will see that Jenkins will integrate with Sonarqube which does code analysis of your project.
Login to SonarQube, click on Projects to see the project dash board.

terraform create s3 bucket example - How to create S3 bucket using Terraform

Terraform is an infrastructure orchestration tool for creating web services in AWS automatically. You can use Terraform for provisioning S3 bucket in AWS.

sudo vi create_s3.tf

resource "aws_s3_bucket" "mybucket" {
  bucket = "my-tf-test-bucket"
  acl    = "public-read"
  website {
    index_document = "hello.html"
   routing_rules = <<EOF
[{
    "Condition": {
        "KeyPrefixEquals": "docs/"
    },
    "Redirect": {
        "ReplaceKeyPrefixWith": "documents/"
    }
}]
EOF
  }

  tags= {
    Name        = "My bucket"
    Environment = "Dev"
  }
}

Once you create the above file, execute terraform plan and then terraform apply to create S3 bucket in AWS.

Terraform destroy single resource or all resources | How to destroy a specific resource using Terraform in AWS cloud

If you would like to destroy all the resources you had created using Terraform, all you have to do is perform the below command:
 
terraform destroy
and type yes to confirm to delete all the resources.

The above command will destroy all the resources.
 
But let's say you would like to destroy only a specific resource you have created using Terraform. You can do it by passing an argument in terraform destroy command. For e.g., if you would like to delete an EC2 instance, you can mention like below:

Destroy specific resource:

First get all the resources created by Terraform:
terraform state list

f you would like to delete the EC2 instance,
terraform destroy -target aws_instance.myInstanceName

if you would like to delete a security group, you can mention like below:
terraform destroy -target aws_security_group.security_group_name
 
Please watch in my YouTube channel on how to do the above steps:


Tuesday, February 12, 2019

Jenkins setup - Install Java, Jenkins, Maven, Tomcat on Ubuntu EC2 - How to install Java, Jenkins, Maven, Tomcat on Ubuntu EC2

Please follow steps to install Java, Jenkins, Maven, Tomcat on Ubuntu EC2. Jenkins is a java based application, so you need to install Java first. 

Java Setup on Ubuntu

sudo apt-get update

Install Java 11

sudo apt-get install default-jdk -y


Now lets do Jenkins installation

Jenkins Setup

Add Repository key to the system

wget -q -O - https://pkg.jenkins.io/debian/jenkins-ci.org.key | sudo apt-key add -
Append debian package repo address to the system

echo deb http://pkg.jenkins.io/debian-stable binary/ | sudo tee /etc/apt/sources.list.d/jenkins.list

sudo apt-get update
Install Jenkins
sudo apt-get install jenkins -y


The above screenshot should confirm that Jenkins is successfully installed.

Access Jenkins in web browser

Now Go to AWS console.
  Click on EC2, click on running instances link. Select the checkbox of EC2 you are installing Java and Jenkins.

  Click on Action.
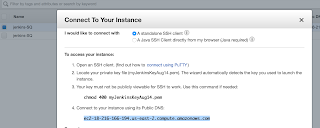
  Copy the value from step 4 that says --> Connect to your instance using its Public DNS


Now go to browser. enter public dns name or public IP address with port no 8080.This is how to select public DNS name:


Unlock Jenkins
You may get screen, enter the below command in Git bash( Ubuntu console)
Get the password from the below file

sudo cat /var/lib/jenkins/secrets/initialAdminPassword

Copy the password and paste in the browser

Click on install suggested plug-ins.
Also create user name and password.
enter everything as admin. at least user name as admin password as admin
Click on Save and Finish. Click on Start to Use.

Maven
Maven is a build tool used for building Java applications. Please click here to learn more about Maven. You can install Maven by executing below command:

sudo apt install maven -y

you can type mvn --version
you should see the below output.


Tomcat Installation

Tomcat is a web server or web container where java web application can be deployed by developers. You can learn more about by clicking this URL.  Tomcat can be installed by executing below commands:

sudo apt-get update
sudo apt-get install tomcat8 -y


sudo apt-get install tomcat8-docs tomcat8-examples tomcat8-admin -y


sudo cp -r /usr/share/tomcat8-admin/* /var/lib/tomcat8/webapps/ -v

Click on this link to know how to make changes using Vi editor.


Change port no from 8080 to 8090
Tomcat default port is also 8080, since we have already used 8080 for Jenkins, we need to change from 8080 to 8090. You can change by modifying server.xml

sudo vi /var/lib/tomcat8/conf/server.xml


you need to scroll down by clicking down arrow button in this file change the port no from 8080 to 8090 at line starting with <Connector port="8080" protocol="HTTP/1.1"

setup an user in tomcat 

sudo vi /var/lib/tomcat8/conf/tomcat-users.xml

Scroll down all the way to the end of the file,
Add the below lines in second last line above (above </tomcat-users>)
<role rolename="manager-gui"/>
<role rolename="manager-script"/>
<user username="tomcat" password="password" roles="manager-gui,manager-script"/>

Add more memory to JVM
sudo vi /etc/default/tomcat8

Look for the line starting JAVA_OPTS and comment that line by adding #.
Add the below line:
JAVA_OPTS="-Djava.security.egd=file:/dev/./urandom -Djava.awt.headless=true -Xmx512m -XX:MaxPermSize=512m -XX:+UseConcMarkSweepGC"

sudo systemctl restart tomcat8

sudo systemctl status tomcat8


you may get message that says tomcat is active running.
press q for quitting from that window. Now go to browser, copy public DNS.

 
You should see a page that says.
It works!!!!

That's it. You have setup both Jenkins and Tomcat successfully!!

Please watch here for live demo:

Saturday, February 9, 2019

Create EC2 Instance - How to create EC2 instance in AWS console

Please follow the below steps to create an EC2 instance. EC2 instance is virtual server provided by AWS. We will be using this EC2 to install Java, Jenkins, Tomcat, Maven. We will be using this as a CI server.

Steps:

1: Go to AWS console. click on All services, Click on Compute -->  Click on EC2


2. Click on Launch instance. Choose an Amazon machine image (AMI), click next


3. select
Ubuntu Server 16.04 LTS (HVM), SSD Volume Type


click next

4. choose an instance type as t2.small, 2GB memory. click next

5. Leave values to default in step 3 and step 4. click next


6. enter tag name in step 5. Click to add a Name tag. it can be something like JenkinsEC2. click next:configure Security Group


7. Click create new security group, give name as MyJenkinsSecurityGroup, add custom rule for 8080, 8090 , allow 0.0.0.0/0 as source IP


8. Click on Review and launch


Click on Launch

09. Choose the existing key pair if you have one, otherwise create new one, give some name as my2020EC2Key. Make sure you download the key. Please do not give any space or any character in naming the key.


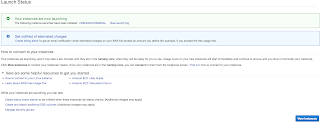
10. Click on launch instance, Scroll down and click on view instances.


Once instance is created. you can see it running..Please click the below link to understand the steps for connecting to EC2 instance from your local machine - windows or Apple laptop.


How to connect to EC2 using Git bash or ITerm in Mac? 

http://www.cidevops.com/2018/02/how-to-connect-to-ec2-instance-from.html

1. go to Downloaded location private key in your local machine.
2. Copy the url from Ec2 console by selecting the instance, click on actions, connect. Please use the above link to connect to EC2 from your local machine.

Watch here for live demo:


Top 10 DevOps Popular Tools | Popular DevOps Tools You Must Know In 2025 | Learn DevOps Tools in 2025

Here are the top 10 DevOps Tools to focus on to put your DevOps learning on a  faster track  and kick start your career quickly as a success...