Friday, January 25, 2019

DevOps / Cloud Hands on Training with 100% Job placement Assitance

Are you in IT? Tired of your work? Not able to make a progress? 
Are you not having a job? Looking for a break in IT? No Worries.. 
Are you interesting in learning about DevOps? 

DevOps is THE hot skill in US. Currently almost all the employers are struggling to get a right resource in their teams who can do the DevOps and automation work..You could be that person by attending my coaching program.

DevOps Coaching Classes schedules for Feb 2023(currently enrollment is going on)

DateTimeTypeWhen?
Feb 11th11:35 AM to 01:30 PM CST on Saturdays
         &
02:00 PM to 04:00 pm CST on Sundays
WeekendsSat/Sun
Feb 27th6:00 to 8:00 PM CSTWeekdaysMondays/Wednedays

DevOps Training highlights:

- Comprehensive hands on knowledge on Git, Jenkins, TeamCity, Maven, SonarQube, Nexus, Terraform, Ansible, Puppet, Docker on AWS and Azure.

- 20+ yrs IT exp, 5+ Yrs in DevOps/Cloud/Automation.

- Many students already placed in reputed companies from my coaching program successfully.

- Working as a Sr.DevOps Coach/Architect in a one of the top IT services companies in USA.

- Unique program...less theory, more hands on lab exercises...in Person class room training

Resume preparation will be done with candidates personally.

One-to-one Interview coaching.

- Coaching is purely hands on with 101% job relevant.

100% Job assistance.

- Both weekday(on-line) & weekend batches available.

- Coached about  600+ people successfully for past 2+ years and many of my students got placed with many large enterprises in DFW, Chicago, Florida, Seattle, Bay area, Ohio and NY areas..

Contact no: 469-733-5248
Email - devops.coaching@gmail.com
Contact: AK

Thursday, January 24, 2019

Install Apache and Maven using Ansible playbook on Ubuntu - Install Maven on Ubuntu using Ansible playbook

Playbook for installing Apache and Maven on Ubuntu using Ansible Playbook

---
- hosts: local
  connection: local
  become: true
  tasks:
    - name: install maven on your local Ubuntu machine
      become: yes
      apt: pkg={{ item }} state=latest update_cache=yes cache_valid_time=3600
      with_items:
        - maven
        - apache2

Wednesday, January 23, 2019

Questions to ask after you are done with DevOps interview

Questions to ask after you giving Devops interview:

1. Where are you in DevOps transformation in your company? What level of maturity team is currently at?
2. What kind of DevOps tools are you using?
3. What level of automation is currently in place in the team?
4. What would be my day to day activities, if I am selected?
5. How are you collaborating within the team? are you using any tools like Slack?
6. Are you completely migrating to cloud such as AWS or Azure or on-prem also?


Sunday, January 20, 2019

How to create EC2 instance using Puppet - How to provision EC2 instances in AWS using Puppet


Here below is the puppet code to provision an EC2 instance on AWS cloud.

create-ec2.pp
ec2_instance { 'My EC2':
    ensure              => present,
    region              => 'us-east-2',
    image_id            => 'ami-916f59f4',
    instance_type       => 't2.micro',
    security_groups     => ['mySecurityGroup'],
    subnet              => 'subnet-aff937d5',
    key_name            => 'mykeyName',
  }

ec2_securitygroup { 'mySecurityGroup':
  region      => 'us-east-2',
  ensure      => present,
  description => 'Security group for aws Ec2 instance',
ingress     => [{
    protocol => 'tcp',
    port     => 8080,
    cidr     => '0.0.0.0/0',
  },{
    protocol => 'tcp',
    port     => 80,
    cidr     => '0.0.0.0/0',
  },{
    protocol => 'tcp',
    port     => 22,
    cidr     => '0.0.0.0/0',
 }],
  tags        => {
    tag_name  => 'mySecurityGroup',
},
}

And then execute the below command to create EC2 instance.
  sudo /opt/puppetlabs/bin/puppet apply create-ec2.pp

Make sure you have access keys and secret keys downloaded from AWS.

sudo vi ~/.aws/credentials
[default]
aws_access_key_id = ?
aws_secret_access_key = ?

Wednesday, January 16, 2019

Change Nexus Default port 8081 - How to change Nexus default port

The default port number for Sonatype Nexus is 8081. It can be changed though.

If you would like to change it, modify in below location:

 $install-dir/etc/org.sonatype.nexus.cfg file
application-port=8082

Click here to see steps for how to install Nexus on Redhat.
Click here to see steps for how to install Nexus on Ubuntu.

Monday, January 14, 2019

Pre-requisites before starting the DevOps Coaching |

Please watch the video first before you get started:


1. Create an account in https://aws.amazon.com. Set that as basic free tier account (personal account). role as developer or anything. You need to enter credit card info. But that’s fine, they won’t charge you except $1.
Sign up free account.

Select Basic Plan..Do NOT select developer plan unless you would like to pay every month.


2. Create an account in https://www.bitbucket.org and https://github.com/
You can sign up using your email.

3. Download and Setup VS Code on your local machine(laptop or computer) by following below link:

4. Start learning Linux Basics:
    Sign up for Linux Basics courses in https://www.udemy.com/topic/linux-administration/

5. Learn Agile/DevOps

6. If you are using windows laptop, Install Git client on your laptop by downloading from http://www.git-scm.com/download


Click on download, once downloaded. Go to downloads directory and click on the EXE.
Choose all options by default by clicking on Next and NExt


7. Only if you are using Macbook pro or iMac desktop, please download iTerm from https://www.iterm2.com/downloads.html. for windows laptop, ignore this step.
Download the iTerm2**.zip file and install iTerm on Mac.


iTerm2 or iTerm 3, anything is fine..

Friday, January 11, 2019

Ansible Playbook to install Java 8 on Ubuntu - How to install Java 8 using Ansible Playbook


Find below Ansible playbook to install Java 8 on Ubuntu

Step 1: Create the playbook first with name. for e.g, installJava.xml

---
- hosts: Java_Group

  tasks:
  - name: Update APT package manager repositories cache
    become: true
    apt:
      update_cache: yes

  - name: Install OpenJDK Java
    become: yes
    apt:
      name: "{{ item }}"
      state: present
    with_items:
     openjdk-8-jdk

2. sudo vi /etc/ansible/hosts

make sure you add below entry with target node IP changed (in red color).

[Java_Group] 
xx.xx.xx.xx ansible_ssh_user=ubuntu ansible_ssh_private_key_file=~/.ssh/id_rsa  ansible_python_interpreter=/usr/bin/python3

3. sudo ansible-playbook installJava.xml

now after successfully executing, enter below command in target node to make sure Java is installed:
java -version

Thursday, January 3, 2019

How to create S3 bucket in AWS using Terraform - Create S3 bucket in AWS using Terraform

Terraform is an infrastructure orchestration tool for creating web services in AWS automatically. You can use Terraform for provisioning S3 bucket in AWS.

sudo vi create_s3.tf

resource "aws_s3_bucket" "mybucket" {
  bucket = "my-tf-test-bucket"
  acl    = "public-read"
  website {
    index_document = "hello.html"
   routing_rules = <<EOF
[{
    "Condition": {
        "KeyPrefixEquals": "docs/"
    },
    "Redirect": {
        "ReplaceKeyPrefixWith": "documents/"
    }
}]
EOF
  }

  tags {
    Name        = "My bucket"
    Environment = "Dev"
  }
}

Once you create the above file, execute terraform plan and then terraform apply to create S3 bucket in AWS.

Ansible playbook install Apache Ubuntu - How To Configure Apache Using Ansible on Ubuntu 16.0.4

Please find steps for installing Apache on Ubuntu using Ansible Playbook:

1. Login to Ansible machine. Create SSH keys in Ansible host machine by executing the below command:
ssh-keygen
2. Copy the public keys(id_rsa.pub) from ansible node each node in /home/ubuntu/.ssh/authorized_keys file. Execute the below command on Ansible and copy the content:
 sudo cat ~/.ssh/id_rsa.pub

3. Now login to target node, execute the below command to open the file
sudo vi /home/ubuntu/.ssh/authorized_keys
type shift A and then enter. now 
    and paste the key in the above file. please do not delete any existing keys.

4. go back to ansible mgmt node, make sure you are able to ssh from ansible mgmt node after copying the keys above:
ssh private_ip_of_target_node
now type exit to come out of the target node.
5. Now in ansible mgmt node, now make changes in /etc/ansible/hosts file to include the node you will be installing software. Make sure you add public IP address as highlighted below in green color:
   sudo vi /etc/ansible/hosts
[Apache_Group]  
34.216.41.94 ansible_ssh_user=ubuntu ansible_ssh_private_key_file=~/.ssh/id_rsa  ansible_python_interpreter=/usr/bin/python3

6. make changes in playbooks as given below,
cd ~/playbooks

sudo vi installApache.xml
Copy the below content

---
- hosts: Apache_Group
  become: true
  tasks:
    - name: Install apcahe
      apt: name=apache2 state=present update_cache=yes

    - name: ensure apache started
      service: name=apache2 state=started enabled=yes


7. now execute the playbook by running the below command:
sudo ansible-playbook installApache.xml
8. This should install Apache on the nodes and should bring the apache up and running.
9. Now enter public ip address or public dns name of target server by in thr browser to see home page of Apache running.

How to integrate Sonatype Nexus with Jenkins - Jenkins Nexus Integration - Upload artifacts from Jenkins to Nexus repository

Let us see how to integrate Jenkins with Nexus and able to upload War/Ear/Jar/Exe/DLLs.

Pre-requisites:

Install Nexus Artifact Uploader plugin in Jenkins.


Steps:

1. Once you installed the above plug-ins, click existing FreeStyle job configuration or create a new job.

2. Under source code management. enter bitbucket repo url and git credentials.

3. Go to build section, add Maven targets. with goals clean install. Also click advance, give path of POM.xml


4. click on Add build step, choose Nexus artifact uploader.


5. Enter information per below screen shot.
Make sure you enter version as 1.0-SNAPSHOT and repository as maven-snapshots

6. Click on Apply, Save.


7. Now login to Nexus repo, Click on Components, Click on maven-snapshots


8. you shall see the WAR being uploaded here.

Wednesday, January 2, 2019

How Git is different than other SCM tools - What is the difference between Git and SVN

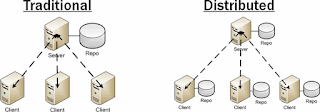
Git is a very popular version control system. In fact, many teams are migrating their code from SVN or TFVC to Git. Git is completely works on distributed model.

Most of version control systems such as SVN, TFVC or CVS work on client-server model. After making code changes, when developers check-in the code changes, it goes to central server. All history is being maintained in a central server, not locally.

Whereas in Git, developers clone the remote repo into local machine which is called local repo. When they clone in local machine, all history is copied into local repo. After making code changes, when they commit the code, it goes into local repo with new version. Then they can push code changes into remote repo where it is available to others. Client and remote server will have full repository.


Here below is the difference Git and other control systems:

Area Git SVN/TFVC
Repository type Distributed Centralized
Full History Local machine Central machine
Checkout They clone the whole repository and do locally changes Developer checkout working copy which is snapshot of a code
Work Offline Yes No
Branching and Merging Reliable, used often, supports fat forward merge and 3-way merge Reliable, use with caution
Operations speed Fast and most are local Network-dependent
Learning Curve Needs a bit time Relatively simple
Staging area Supported to stash the temporary changes and retrieve it back later Not supported
Collaboration model Repository-to-repository interaction Between working copy and central repo

DevSecOps Bootcamp Dec 2024 Schedule | DevSecOps & AWS Azure Cloud Coaching by Coach AK | DevSecOps and Cloud Computing Online Classes

Lot of new topics covered like GitHub Actions, GitHub Advanced Security, Helm, Prometheus and Grafana..) The DevOps requirements in the IT m...